The perfect calf shed is not the flashest one.
It is the one that keeps calves dry, warm, clean, easy to feed, easy to clean, and easy to work in when you are tired, under pressure, and spring is doing its usual thing.
That matters, because most calf shed problems are not really calf problems at all. They are design problems. A shed that is hard to wash out, hard to ventilate, awkward to feed in, or too easy to overcrowd will test you every day of the season. DairyNZ’s current calf housing guidance puts the basics plainly: calf comfort comes first, sheds need regular circulation of clean air without draughts at calf level, calves need enough space, and the system should be flexible enough to adjust to weather and changing group sizes.
So if you were building a calf shed from scratch — or upgrading an old one — what would a smart New Zealand farmer actually do?
Start with the site, not the shed
A good calf shed starts with where it sits.
If the site is wet, muddy, shaded all winter and hard to get trucks or feed carts around, the building will always be working uphill. You want natural drainage, easy vehicle access, room to turn trailers, and enough hardstand outside the shed that you are not dragging mud straight back in all spring. In practice, a slightly elevated site with good fall away from the shed is worth a lot.
Orientation matters too. New Zealand’s climate is heavily shaped by prevailing westerlies, but local patterns vary. NIWA notes that much of the country is influenced by westerly airflows; Canterbury Plains commonly deal with northeast and southwest winds; Northland and parts of the upper North Island often see dominant southwest flows in exposed areas.
That means the “right” shed opening depends on where you are:
-
In wet western or exposed areas, you usually want the open side protected from the worst driving rain.
-
In Canterbury, you think carefully about both the nor’easter and the colder southwest change.
-
In Southland or Otago, shelter from cold wind matters more than chasing every bit of airflow.
-
In warmer northern districts, the ability to open a shed up in mild weather becomes more important.
A good rule is to orient the shed so it gets light and air, but not a full blast of the weather that causes you grief most often.
Build for dry calves, not just strong walls
The best calf shed in the world fails if calves are damp.
DairyNZ is very clear that calves need dry, comfortable bedding and that calves on hard stone surfaces are colder, lie down less, and show less play behaviour than calves on softer bedding. They also stress that bedding needs to keep calves warm and dry, and drain freely.
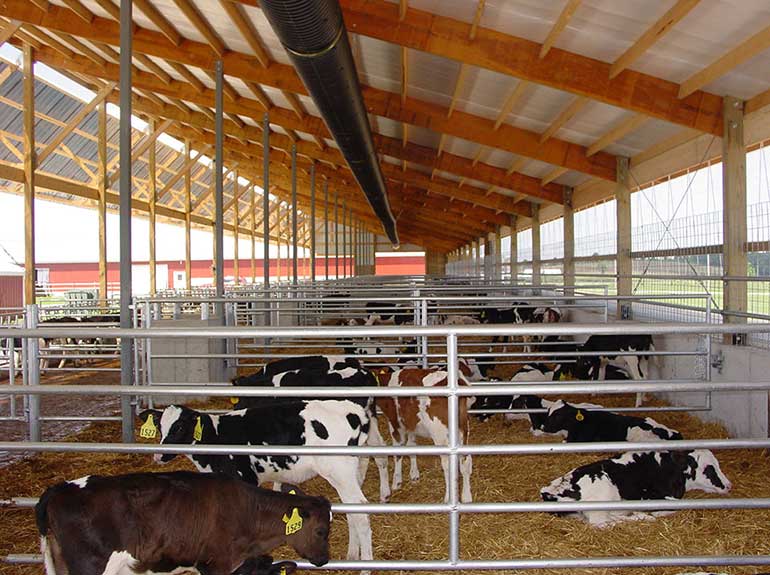
That means the perfect shed is designed around a dry lying area. A lot of smart setups use:
-
a concrete feed and work area at the front
-
a raised or well-bedded lying area at the back
-
drainage that takes water and wash-down away quickly
-
enough roof overhang that rain is not blowing onto bedding every second day
You do not need to overcomplicate it. What matters is that calves have a dry place to lie, and staff can keep it that way without a huge labour bill.
Use the right timber in the right place
This is where it pays to think like a practical Kiwi, not just a builder.
BRANZ notes that treated timber in New Zealand is specified by hazard class, with treatment levels matched to end use and moisture exposure. In broad terms, H3.2 and above are the treatment classes where durability and corrosion of fixings become more serious considerations, especially in wet or exposed locations. BRANZ also notes that where timber has been treated to H3.2 or higher, stainless steel fixings are recommended in regularly wet areas or where newer ACQ/CuAz treatments are used, because treatment chemistry can accelerate corrosion.
For a practical calf shed, the rough logic is:
-
H4 posts for anything in the ground or in constant contact with damp concrete or splash zones.
-
H3.2 timber for exposed rails, kickboards, external framing and anything likely to get wet or washed often.
-
Standard dry structural framing only where it will genuinely stay dry and protected.
If you are building something structural, use correctly graded and treated timber and get proper building advice. But for farm practicality, many people already have useful material on hand:
-
rough-sawn treated pine
-
old rails
-
recycled yard timber
-
macrocarpa or cypress offcuts
-
old gates and battens
Those can be excellent for non-structural jobs like kickboards, divider rails, storage racks, gates, shelves, wind baffles and feeder stands. I would be more cautious using random recycled timber in anything load-bearing unless you know exactly what it is and what condition it is in.
The smart-farmer version of this is simple: use your best, most durable timber where calves, water, and machinery will punish it. Save the recycled bits for fit-out jobs where they can be replaced easily.
Design the ventilation so you can change it with the season
Ventilation is one of the hardest things to get right, and one of the most important.
DairyNZ says sheds need regular circulation of clean air to reduce respiratory disease risk, but calves must not be exposed to draughts at calf level. Their advice to literally get down to calf height and check for draughts at different times of day is excellent.
The smartest calf sheds are not just “open” or “closed.” They are adjustable.
That can mean:
-
roll-up sides
-
removable shade cloth or windbreak mesh
-
half-height plywood or timber shutters
-
top venting under the ridge
-
hinged side flaps
-
old conveyor belt or heavy PVC strips as temporary weather breaks in exposed spots
In Northland or Waikato, you may want the shed more open through warm muggy spells and more closed when cold southerlies arrive. In Canterbury, you may want to tighten the shed up during cold southwest changes and open it back up when conditions settle. In Southland, you may prioritise shelter lower down and venting higher up. The trick is to let stale air out without putting calves in a wind tunnel.
A very practical hack is this:
block wind low, vent air high.
That principle solves a lot of calf shed headaches.
Put water where you actually need it
Every good calf shed should have:
-
fresh cold water on tap
-
reliable hot water
-
a proper wash-up area
DairyNZ recommends clean water always be available to calves, and notes that without water, meal intake drops and rumen development and weight gain slow down.
For the shed itself, hot water is a genuine labour saver. It makes washing milk gear easier, gets fat and residue off feeders better, and makes end-of-day clean-up faster. If I were designing a practical NZ calf shed, I would absolutely want:
-
one hose point for the shed
-
one hose point near the mixing area
-
hot water at the wash-up sink
-
a drain that can cope with real wash-down, not just a dribble
And yes, an old stainless kitchen sink can be brilliant. Plenty of farm workshops and calf sheds have been made better by repurposing a good old sink and bench. They are easy to clean, easy to plumb, and ideal for washing teats, jugs, medications, buckets and hands. It does not need to be pretty. It needs to be useful.
Make the feeding workflow almost boring
The perfect calf shed is one that reduces steps.
That sounds simple, but it changes everything. If you are carrying buckets too far, doubling back for powder, washing gear in the wrong place, or walking the full length of the shed 20 times every feed, the shed is badly designed.
A good feeding workflow usually means:
-
powder storage close to the mixing area
-
hot and cold water right there
-
bench space for scales, additives and notebooks
-
a clear route from mixer to pens
-
feeders positioned so one person can move down the line smoothly
-
enough gate and pen layout that calves can be checked quickly without climbing through chaos
DairyNZ also points out that feed and water should be positioned so calves can access them comfortably and multiple calves can eat at once, reducing competition.
That is one reason long, narrow pens often work better than awkward deep corners. You can observe more, feed faster, and spot shy calves earlier.
A few labour-saving ideas that make sense on NZ farms:
-
mount scoop hooks, hoses and teat racks where they are used, not where they “fit”
-
keep one dedicated medicine and electrolyte shelf in the shed
-
use a whiteboard at the entry for pen numbers, treatment notes and milk rates
-
design gates so one person can move calves without needing a second set of hands
-
allow enough space for a trolley, calfateria, quad, or small feed cart if you use one
-
build in a place for bags, bins, and rubbish so the shed stays workable when busy
The perfect calf shed does not just house calves well. It saves your legs.
Give yourself a sick pen and an overflow plan
DairyNZ recommends a separate isolation area for calves needing special attention and notes that complete pen emptying helps break pathogen build-up.
That is practical gold.
A lot of calf sheds work well until the first real pressure point. Then the question becomes: where does the sick calf go, where do the late calves go, and where do you put the extra ten when the numbers spike?
The perfect shed has:
-
one or two easy-to-clean sick pens
-
a space you can temporarily convert for overflow
-
a layout that lets you keep age groups sensible
-
enough flexibility that the whole system does not break when reality turns up
This is where multi-use thinking helps.
Make it a shed that earns its keep all year
A very smart New Zealand farmer often wants the calf shed to do more than one job.
Outside calf season, parts of the building might be used for:
-
storing calf gear and minerals
-
lamb or kid rearing
-
holding small mobs temporarily
-
dry storage for pallets or packaging
-
workshop overflow
-
covered loading in bad weather
That does not mean compromising calf comfort. It just means thinking ahead. Use gates, dividers and fixtures that can be removed or folded away. Build in power and lighting that are useful year-round. Make the wash-up area practical for more than one job. Design the space so it is still a good farm asset in December, not just in August.
Keep the materials honest and easy to replace
The perfect calf shed should not be precious.
Kickboards will get kicked. Gates will get leaned on. Feeders will get dropped. Water lines will get tested. So I would always favour materials that are:
-
durable
-
common in NZ
-
easy to source again
-
easy to patch or replace
That usually means simple treated pine, galvanised steel, concrete, ply where appropriate, and practical fittings rather than fancy custom pieces that are hard to replace when they fail in the middle of spring.
Final thought
The perfect calf shed is not really about perfection.
It is about designing a shed that works with New Zealand weather, with New Zealand farm labour realities, and with the way calves actually behave. It is a shed that keeps calves dry, lets air move without chilling them, gives you hot water where you need it, uses the right timber in the wet places, and makes feeding and cleaning easier every single day.
If a shed can do that — and maybe earn its keep in the off-season too — then that is about as close to perfect as most farmers need.